| The article's lead section may need to be rewritten. Please help improve the lead and read the lead layout guide. (September 2021) (Learn how and when to remove this message) |

A spherometer is an instrument used for the precise measurement of the radius of curvature of a curved surface. Originally, these instruments were primarily used by opticians to measure the curvature of the surface of a lens.
Design
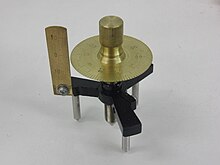
A spherometer usually consists of:
- A frame with three legs, arranged in an equilateral triangle of known radius. The outer legs of some spherometers can be moved to a set of inner holes in order to accommodate a smaller surface. The lower ends of the legs are finely tapered and terminate in hemispheres.
- A central leg, which can be raised or lowered via a screw.
- A reading device for measuring the distance the central leg is moved. Often this consists of a marked dial attached to the top of the screw and a vertical scale attached to the frame. This both indicates the number of turns of the screw and serves as an index for reading the divisions on the dial. A lens may be fitted in order to magnify the scale divisions.
On new spherometers, the vertical scale is marked off in units of 0.5 mm. One complete turn of the dial also corresponds to 0.5 mm and each small graduation on the dial represents 0.005 mm. The graduations on old spherometers are 0.001 mm.
Principles of operation
To measure the radius of a sphere—e.g. the curvature of a lens—the spherometer is leveled and read, then placed on the sphere, adjusted until the four points exert equal pressure, and read again. The difference gives the thickness of that portion of the sphere cut off by a plane passing through the three feet. A contact-lever, delicate level or electric contact may be attached to the spherometer in order to indicate the moment at which the four points exert equal pressure.
The spherometer directly measures a sagitta, h. If the mean length between two outer legs is a, the spherical radius R is given by the formula
Using a spherometer with a circle cup of diameter D, the spherical radius R is instead given by the formula
Alternative uses
Since the spherometer is essentially a type of micrometer, it can be employed for purposes other than measuring the curvature of a spherical surface. For example, it can be used to measure the thickness of a thin plate.
To do so, the instrument is placed on a perfectly level plane surface and the screw turned until the point just touches; the exact instant when it does so is defined by a sudden diminution of resistance followed by a considerable increase. The dial and scale are read, the screw is raised, the thin plate slipped under it, and the process is repeated. The difference between the two readings gives the required thickness.
Similarly, the instrument can measure the depression in an otherwise flat plate. The method is as for measuring the thickness of a plate, except that the micrometer portion is placed over the depression and the measurement is taken below the surface instead of above.
This type of instrument is commonly used in inspecting oil field tool pipe for metal surface pits, fractures, and roundness before being shipped to drilling sites for exploratory wells, so that weakened drill pipe will not fracture during drilling. Tool pipe with thicker than 1" walls for a 4" diameter tube of hardened steel, fitted with tapered thread collars, are re-used after drilling is complete and thinner-walled tubular oil-well casing is in place. Electronic instruments similar to the spherometer in design are used at inspection plants for casing, tubing, and drill pipe. The equivalent measurements in optics would be for a cylinder, or lens with a cylindrical component having an optical axis, where a plane through the lens would produce an oval circumference.
An alternate approach using coordinate geometry was developed recently. This approach reproduces the well-known result for the spherometer and also leads to a scheme to study aspherical surfaces.
A related device is the cylindrometer (also known as cylindro-spherometer or sphero-cylindrometer), which can additionally measure the radius of curvature of a right-circular cylinder.
See also
References
-
 This article incorporates text from a publication now in the public domain: Chisholm, Hugh, ed. (1911). "Spherometer". Encyclopædia Britannica (11th ed.). Cambridge University Press.
- Anderson, Robert O. (1984). Fundamentals of the Petroleum Industry. Norman, Okla.: University of Oklahoma Press.

