| Raid on Scarborough, Hartlepool and Whitby | |||||||
|---|---|---|---|---|---|---|---|
| Part of the First World War | |||||||
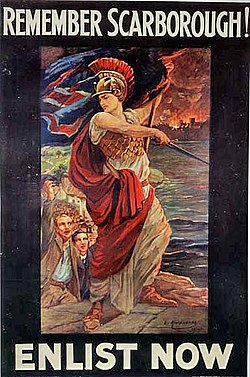 Remember Scarborough! Enlist Now!, Edith Kemp-Welch | |||||||
| |||||||
| Belligerents | |||||||
|
|
| ||||||
| Commanders and leaders | |||||||
|
|
| ||||||
| Strength | |||||||
|
4 battlecruisers 1 armoured cruiser 4 light cruisers 18 destroyers |
2 coastal batteries 6 dreadnoughts 4 battlecruisers 4 armoured cruisers 4 light cruisers 2 scout cruisers 7 destroyers | ||||||
| Casualties and losses | |||||||
|
8 sailors killed and 12 wounded 1 armoured cruiser damaged 2 light cruisers damaged |
122 civilians killed and 443 wounded 5 soldiers killed 2 sailors killed 14 military personnel wounded in total 1 scout cruiser damaged 3 destroyers damaged | ||||||
The Raid on Scarborough, Hartlepool and Whitby on 16 December 1914 was an attack by the Imperial German Navy on the British ports of Scarborough, Hartlepool, West Hartlepool and Whitby. The bombardments caused hundreds of civilian casualties and resulted in public outrage in Britain against the German Navy for the raid and the Royal Navy for failing to prevent it.
Background
Main article: High Seas FleetThe German High Seas Fleet had been seeking opportunities to isolate small sections of the Grand Fleet of the Royal Navy to cut off, trap and destroy. A raid on Yarmouth had produced few results but demonstrated the potential for fast raiding into British waters. On 16 November, Rear Admiral Franz von Hipper, commander of the German battlecruiser squadron, persuaded his superior, Admiral Friedrich von Ingenohl, to ask the Kaiser for permission to conduct another raid. The U-boat U-17 was sent to reconnoitre coastal defences near Scarborough and Hartlepool. The captain reported little onshore defence, no mines within 12 miles (10 nmi) of the shore and a steady stream of shipping.
It was also believed that two British battlecruisers—which would be the fast ships sent out first to investigate any attack—had been despatched to South America and had taken part in the Battle of the Falkland Islands. Hipper commanded the battlecruisers SMS Seydlitz, Von der Tann, Moltke and Derfflinger, the armoured cruiser SMS Blücher, the light cruisers SMS Strassburg, Graudenz, Kolberg and Stralsund and 18 destroyers. Ingenohl took the 85 ships of the High Seas Fleet to a position just east of the Dogger Bank where they could assist, if Hipper's ships came under attack from larger forces but were still close to Germany for safety, as standing orders from the Kaiser instructed.
British intelligence
The High Seas Fleet was outnumbered by the Grand Fleet and perforce, avoided a fleet action. The Grand Fleet had to patrol continuously, whereas the ships of the High Seas Fleet could remain in port; the German navy could choose when to concentrate its ships and the British would always be dispersed. Several months after the declaration of war in August 1914, wear on the British ships reached the point where repairs could not be postponed and several ships were withdrawn from the Grand Fleet. Three battlecruisers had been sent to South America and the brand-new super-dreadnought HMS Audacious had been lost to a mine; HMS Thunderer, another super-dreadnought, was undergoing repairs. German ships used three main codes for which codebooks were issued to their ships; copies had been obtained by the Entente from sunk or captured vessels, unbeknown to the Germans. The British code breakers of Room 40 at the Admiralty could read German messages within a few hours of receiving them. Sufficient information had been gleaned on the evening of 14 December to know that the German battlecruiser squadron would shortly be leaving port but did not suggest that all of the High Seas Fleet might be involved.
Prelude
Admiral John Jellicoe, commanding the Grand Fleet at Scapa Flow, was ordered to despatch the 1st Battlecruiser Squadron (Vice-Admiral David Beatty), with HMS Lion, Queen Mary, Tiger and New Zealand, together with the 2nd Battle Squadron (Vice-Admiral Sir George Warrender) comprising the modern dreadnoughts HMS King George V, Ajax, Centurion, Orion, Monarch and Conqueror, with the 1st Light Cruiser Squadron (Commodore William Goodenough) commanding HMS Southampton, Birmingham, Falmouth and Nottingham. Commodore Reginald Tyrwhitt at Harwich was ordered to sea with his light cruisers, HMS Aurora and Undaunted and 42 destroyers. Commodore Roger Keyes was ordered to send eight submarines and his two command destroyers, HMS Lurcher and Firedrake, to take station off the island of Terschelling, to catch the German ships should they turn west into the English Channel. Jellicoe protested that although such a force should be sufficient to deal with Hipper, it would not be able to match the High Seas Fleet. The 3rd Cruiser Squadron (Rear-Admiral William Pakenham) from Rosyth, with the armoured cruisers HMS Devonshire, Antrim, Argyll and Roxburgh were added to the force. Jellicoe chose the point for this fleet to assemble, 25 mi (22 nmi) south-east of the Dogger Bank. The intention was to allow the raid to take place, then ambush the German ships as they returned.
Raid
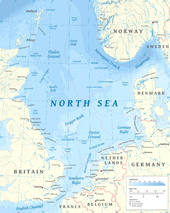
Admiral Hipper left the Jade Bight at 03:00 on 15 December. During the following night, SMS S33, one of the escorting destroyers, became separated and broke wireless silence to ask for direction. This risked giving away the presence of the ships and the destroyer was ordered to be silent. Still lost, it headed for home but on the way, sighted four British destroyers which it reported by wireless. Hipper also noted radio traffic from British ships which caused concern that the British might be aware something was up. He attributed this to possible spying by trawlers which were encountered during the day. The deteriorating weather was also causing problems. At 06:35 on 16 December, the destroyers and three light cruisers were ordered to return to Germany. Kolberg remained, as she had 100 mines to lay.
The remaining ships divided, Seydlitz, Blücher and Moltke proceeded towards Hartlepool, while Derfflinger, Von der Tann and Kolberg approached Scarborough. At 08:15, Kolberg began to lay mines off Flamborough Head in a line extending 10 mi (8.7 nmi) out to sea. At 08:00, Derfflinger and Von der Tann began to bombard the town. Scarborough Castle, the prominent Grand Hotel, three churches and various other properties were hit. Civilians crowded into the railway station and the roads leading out of the town. At 09:30, the two battlecruisers ceased fire and moved on to nearby Whitby, where a coastguard station was shelled, incidentally hitting Whitby Abbey and other buildings in the town.
Hartlepool was a more significant target than the resort town of Scarborough. The port had extensive docks and factories and was defended by three 6-inch naval guns on the seafront. Two guns were at Heugh Battery and one at Lighthouse Battery. The guns were manned by 11 officers and 155 local men of the Durham Royal Garrison Artillery. The gun crews were warned at 04:30 of the possibility of an attack and were issued live ammunition. At 07:46, they received word that large ships had been sighted and at 08:10, a bombardment of the town began. No warning had been given to naval standing patrols in the area and the poor weather just before the raid meant that only four destroyers were on patrol, while two light cruisers and a submarine remained in Hartlepool harbour. Destroyers HMS Doon, Test, Waveney and HMS Moy were on patrol when Doon saw three large vessels approaching at 07:45, which opened fire shortly after. The only weapons the destroyers carried capable of damaging large vessels were torpedoes; as the ships were out of torpedo range the destroyers turned away except for Doon, which closed to 5,000 yd (2.8 mi; 4.6 km), fired one torpedo which missed and also turned away.
The shore batteries remained confused about the approaching ships until shells began to fall. The German ships were at such short range that the shell fuzes did not have time to set and many failed to explode or ricocheted into the town, because they were travelling horizontally, rather than plunging. Two shore guns fired at the leading ship, while the third fired at the last, smaller, vessel. The gunners were hampered by a rising cloud of smoke and dust around them, affecting visibility. They found their shells had no effect on the armoured sides of the ships, so instead aimed at masts and rigging. The accuracy of the third gun was sufficient to oblige Blücher to move behind the lighthouse to prevent further hits. Two of her 15 cm (5.9 in) guns were disabled; the bridge and a 210 mm (8.3 in) gun were damaged.
In the harbour, Captain Alan Bruce of the scout cruiser HMS Patrol attempted to put to sea but the ship was hit by two 210 mm shells, forcing Bruce to beach the ship. The second scout cruiser, HMS Forward, had no steam in her boilers and could not move. The submarine HMS C9 followed Patrol to sea but had to dive when shells started falling around it and at 08:50, the German ships departed. The ships had already departed when Patrol was clear of the harbour; Commodore Roger Keyes commented afterwards, that a target of three stationary cruisers was exactly what the submarine had been intended to attack.
Encounter with the High Seas Fleet
The battleships and cruisers commanded by Warrender set out from Scapa Flow at 05:30 on 15 December. The bad weather meant that he could not take destroyers with him but Beatty brought seven when he departed from Cromarty at 06:00, together with the battlecruiser squadron. The two forces rendezvoused at 11:00 near Moray Firth. As the senior admiral, Warrender had command of the force, which sailed toward its ambush position at Dogger Bank. At 05:15 on 16 December, the destroyer HMS Lynx sighted an enemy ship (the destroyer SMS V155). The destroyer squadron went to investigate and an engagement began with a force of German destroyers and cruisers; Lynx was hit, damaging a propeller. HMS Ambuscade was taking on water and had to turn away. HMS Hardy came under heavy fire from the cruiser SMS Hamburg, suffering severe damage and catching fire but managed to fire a torpedo. News of a torpedo attack was passed to Ingenohl, whose outlying destroyers were the ones involved in the fighting. The engagement was broken off after a couple of hours in the dark but at 06:03 the following morning one of the four destroyers still able to fight, HMS Shark, again came in contact with five enemy destroyers and the British destroyers attacked. The German ships withdrew, reporting another contact with an enemy force to Ingenohl.
Ingenohl had already exceeded his standing orders from the Kaiser by involving the main German fleet in the operation, without informing the Kaiser. At 05:30, mindful of the orders not to place the fleet in jeopardy and fearing he had encountered the advance guard of the Grand Fleet, he reversed course towards Germany. Had he continued, he would shortly have engaged the four British battlecruisers and six battleships with his much larger force, which included 22 battleships. This was the opportunity that German strategy had been seeking, to even the odds; the ten British capital ships would have been outnumbered and outgunned; their loss would have ended the British numerical advantage. Churchill later defended the situation, arguing that the British ships were faster and could have turned about and run. Others, such as Jellicoe, felt there was a risk that an admiral such as Beatty would have insisted upon engaging the enemy once contact was established. Admiral Alfred von Tirpitz commented "Ingenohl had the fate of Germany in his hand".
At 06:50, Shark and the destroyers sighted the cruiser SMS Roon with its destroyer escort. Captain Loftus Jones reported his sightings at 07:25, the signal being received by Warrender and also by New Zealand in Beatty's squadron but the information was not passed on to Beatty. At 07:40 Jones, attempting to close on Roon to fire torpedoes, discovered that she was accompanied by two other cruisers and was obliged to withdraw at full speed. The German ships gave chase but could not keep up and shortly returned to their fleet. Warrender changed course towards the position given by Shark, expecting Beatty to do the same. At 07:36, he attempted to confirm that Beatty had changed course but did not get a reply. At 07:55, he managed to make contact and Beatty sent New Zealand, his nearest ship, followed by the three light cruisers, spaced 2 mi (1.7 nmi) apart, to maximise their chance of spotting the enemy, followed by the remaining battlecruisers. At 08:42, Warrender and Beatty intercepted a message from Patrol at Scarborough that she was under attack by two battlecruisers. The chase of Roon, which might have led to an encounter with the main German fleet, was abandoned and the British squadron turned north to intercept Hipper.
Hipper's return

At 09:30 on 16 December, Hipper's ships recombined and headed for home at maximum speed. His destroyers were about 50 mi (43 nmi) ahead, still moving slowly in bad weather. On inquiring where the High Seas Fleet was, he discovered that it had returned home and that his destroyers had sighted British ships. Jellicoe was requested to move south with the Grand Fleet, which was waiting at Scapa Flow. Tyrwhitt was ordered to join Warrender with his destroyer flotilla but bad weather prevented this. Instead he joined the chase with his four light cruisers. Keyes's submarines were to move into Heligoland Bight to intercept ships returning to Germany. Warrender and Beatty kept apart to avoid shallow water over the Dogger Bank and to cut off different routes which Hipper might take to avoid minefields laid off the Yorkshire coast. Beatty's light cruisers entered the mined channels to search.
At 11:25, the light cruiser Southampton sighted German ships ahead. The weather had started clear with good visibility, deteriorated again. Southampton reported that she was engaging a German cruiser accompanied by destroyers and Birmingham went to assist. Goodenough sighted two more cruisers, Strassburg and Graudenz but failed to report them. The two remaining British light cruisers moved off to assist but Beatty, not having been informed of the larger force, called one of them back. Due to confused signalling, the first cruiser misunderstood the message flashed by searchlight, passed it on to the others and all four disengaged and turned back to Beatty. Had Beatty appreciated the number of German ships, it is likely that he would have moved forward with all his ships, instead of recalling the one cruiser to screen his battlecruisers. The larger force suggested that bigger German ships would be following. The ships had disappeared but were heading toward the opposite end of the minefield, where Warrender was waiting. At 12:15, the German cruisers and destroyers exited the southern edge of the minefield and saw battleships ahead. Stralsund flashed the recognition signal, which had been sent to her shortly before, when she encountered Southampton, gaining a little time. Visibility was now poor through rain and not all the British battleships had seen the enemy. Orion's captain, Frederick Dreyer, trained his guns on Stralsund and requested permission of his superior, Rear Admiral Sir Robert Arbuthnot, who refused until Warrender granted permission. Warrender also saw the ships and ordered Pakenham to give chase with the four armoured cruisers but these were too slow and the Germans disappeared again into the mist.
Beatty received the news that Warrender had sighted the ships and assumed that the battlecruisers would be following on behind the lighter vessels. He abandoned the northern exit of the minefield and moved east and then south, attempting to position his ships to catch the German battlecruisers, should they slip past the slower British battleships. Hipper initially attempted to catch up with his cruisers and come to their aid but once they reported the presence of British battleships to the south and that they had slipped past, he turned north to avoid them. Warrender, realising that no battlecruisers had appeared in his direction, moved north but saw nothing. Kolberg, damaged in the raid and lagging behind the others, saw the smoke from his ships but was not seen; Hipper escaped. Belatedly, the Admiralty intercepted signals from the High Seas Fleet at Heligoland as it returned to port and now warned the British ships that the German fleet was coming out. Jellicoe with the Grand Fleet continued the search on 17 December, to engage the High Seas Fleet but it was safely in harbour. Keyes's submarines had been despatched to find returning German ships and also failed, although one torpedo was fired at SMS Posen by HMS E11, which missed. The Admiralty ordered Keyes to take his two destroyers and attempt to torpedo Hipper as he returned home around 02:00; Keyes had considered this and wanted to try but the message was delayed and failed to reach him until too late.
Aftermath
Analysis
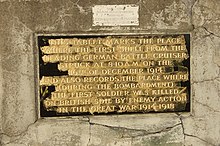
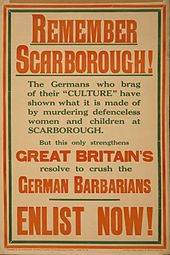
The raid caused a great scandal in Britain, became a rallying cry against Germany for its attack upon civilians and against the Royal Navy for failing to prevent it. The attack became part of a British propaganda campaign; 'Remember Scarborough' was used on army recruitment posters and editorials in neutral America condemned it; "This is not warfare, this is murder". At first, blame for the light cruisers disengaging from the German ships fell upon the commander, Goodenough, but the action was contrary to his record. Blame eventually settled on the confused signals, which had been drafted by Lieutenant Commander Ralph Seymour, who remained flag officer to Beatty, making similar costly mistakes at the Battle of Dogger Bank and at the Battle of Jutland. An order was promulgated to captains to double-check any orders to disengage if in an advantageous position.
The High Seas Fleet had failed to engage the inferior British squadrons at Dogger Bank and the British nearly led a chase into the German fleet even after it had turned away. By chance the British drew back and Hipper escaped the two forces set to trap him. Jellicoe resolved that the entire Grand Fleet would be involved from the start in similar operations and the battlecruisers were moved to Rosyth to be closer. The Kaiser reprimanded his admirals for their failure to capitalise upon an opportunity but made no changes to the orders restricting the fleet, which were largely responsible for Ingenohl's decisions.
In 2010 archaeologist Bob Clarke, a local to Scarborough, wrote that at the time Scarborough was noted in maritime literature as a defended town due primarily to the castle site. The town had three radio stations as well as new technology in the organisation of the British fleet. The shell patterns suggest that these were the targets for the raid on 16 December 1914, not civilians as reported at the time and since.
Casualties
The German ships fired 1,150 shells into Hartlepool, striking targets including the steelworks, gasworks, railways, seven churches and 300 houses. People fled the town by road and attempted to do so by train; 86 civilians were killed and 424 injured (122 killed and 443 wounded according to Arthur Marder in 1965). Seven soldiers were killed and 14 injured. The death of Private Theophilus Jones of the Durham Light Infantry, age 29, was the first death of a British soldier from enemy action on British soil for 200 years. Eight German sailors were killed and 12 wounded.
See also
- Raid on Yarmouth (1914)
- Bombardment of Yarmouth and Lowestoft (1916)
Photo gallery
-
 Five members of the Bennett family were killed during the raid.
-
 The damaged lighthouse at Scarborough.
-
 A shell fragment from the raid.
-
 An unexploded shell from the raid.
-
 Further damage to the ruined Whitby Abbey.
-
 Damage to The Grand Hotel in Scarborough.
-
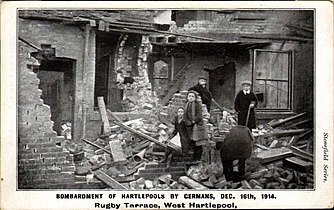 A damaged house at Rugby Terrace.
-
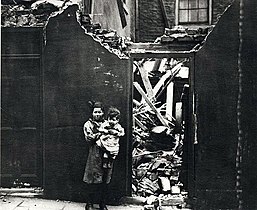 A damaged house at Sussex Street.
-
 A damaged house at Union Road.
-
 Damage at St. Barnabas church.
-
 Damage at Prissick Schools.
Notes
- The difference between the two was less at this period than later in the war when Britain increased its lead in dreadnoughts, considered decisive in a fleet engagement.
Footnotes
- Corbett 2009, p. 35.
- ^ Massie 2004, p. 328.
- Massie 2004, pp. 327–328.
- Massie 2004, pp. 331–332.
- Massie 2004, p. 332.
- ^ Massie 2004, p. 333.
- Massie 2004, p. 329.
- Massie 2004, pp. 319–321.
- Litchfield 1992, App 1.
- Massie 2004, pp. 322–323.
- Massie 2004, pp. 323, 331.
- Corbett 2009, p. 34.
- Massie 2004, pp. 323–324.
- Massie 2004, pp. 335–336.
- Massie 2004, pp. 337–338.
- Massie 2004, pp. 327, 328.
- Massie 2004, p. 339; Churchill 1923, p. 473.
- Massie 2004, p. 340.
- Massie 2004, p. 339; Tirpitz 1919, p. 285.
- Massie 2004, pp. 342–343.
- Massie 2004, p. 331.
- Massie 2004, p. 345.
- ^ Massie 2004, p. 348.
- Massie 2004, pp. 349–350, 351.
- Massie 2004, p. 350.
- Massie 2004, p. 354.
- Ind 1914, p. 486.
- Massie 2004, p. 356.
- Massie 2004, pp. 357–360.
- Clarke 2010, preface.
- Witt & McDermott 2016, p. 139.
- Marder 1965, p. 149.
- Stranton Grange Cemetery burials 1912–1919 Archived 23 September 2017 at the Wayback Machine Durham Records Online, 3 January 2013. Retrieved 23 September 2017.
- "Casualty record, Theophilus Jones". Commonwealth War Graves Commission. Archived from the original on 7 November 2018. Retrieved 6 November 2018.
- Massie 2004, pp. 324–325.
References
Books
- Churchill, Winston (1923). The World Crisis. Vol. I. London: Thornton Butterworth. OCLC 752891307. In four volumes
- Clarke, B. (2010). Remember Scarborough: A Result of the First arms race of the Twentieth Century. Stroud: Amberley. ISBN 978-1-84868-111-8.
- Corbett, J. S. (2009) . Naval Operations. History of the Great War Based on Official Documents by Direction of the Historical Section of the Committee of Imperial Defence. Vol. II (2nd, Imperial War Museum and Naval & military Press repr. ed.). London: Longmans, Green & Co. ISBN 978-1-84342-490-1.
- Litchfield, Norman E. H. (1992). The Territorial Artillery 1908–1988 (Their Lineage, Uniforms and Badges). Nottingham: Sherwood Press. ISBN 978-0-9508205-2-1.
- Marder, Arthur J. (1965). From the Dreadnought to Scapa Flow, The Royal Navy in the Fisher Era, 1904–1919: The War Years to the eve of Jutland: 1914–1916. Vol. II. London: Oxford University Press. OCLC 865180297.
- Massie, Robert K. (2004). Castles of Steel: Britain, Germany, and the Winning of the Great War at Sea. London: Jonathan Cape. ISBN 978-0-224-04092-1.
- Tirpitz, Alfred von (1919). My Memoirs. Vol. II. New York: Dodd, Mead. OCLC 910034021. Retrieved 14 July 2017.
- Witt, Jann M.; McDermott, R. (2016). Scarborough Bombardment: Der Angriff der deutschen Hochseeflotte auf Scarborough, Whitby und Hartlepool am 16. Dezember 1914 [Scarborough Bombardment: The Attack by the German High Seas Fleet on Scarborough, Whitby and Hartlepool on 16 December 1914]. dual English and German. Berlin: Palm Verlag. ISBN 978-3-944594-50-7.
Newspapers
- "It is Magnificent but it is not War". The Independent. 80 (3447). New York. 28 December 1914. OCLC 4927591. Retrieved 15 July 2017.
Further reading
- Groos, O. (1923). Der Krieg in der Nordsee: Von Ende November 1914 bis Anfang Februar 1915 [The War in the North Sea: From the End of November 1914 to the Beginning of February 1915]. Das Admiralstabswerk: Der Krieg zur See 1914–1918 Herausgegeben von Marine-Archiv, Verantwortlicher Leiter der Bearbeitung . Vol. III (online scan ed.). Berlin: Mittler & Sohn. OCLC 310902159. Retrieved 15 July 2017 – via navy history com.
- Hart, Chris (2018). "Remember Scarborough. Re-Active Propaganda as Natural Ethics". World War I. Media, Entertainments & Popular Culture. Cheshire: Midrash. ISBN 978-1-905984-21-3.
External links
- Gary Staff (translation), "German Bombardment of Hartlepool, Whitby and Scarborough on 15th and 16th December 1914." From the Kriegsmarine's Official History (Krieg zur See)
- Battles: Raid on Scarborough, Hartlepool and Whitby, 1914 FirstWorldWar.net
- Royal Navy
- The bombardment of Scarborough 1914 BBC News
- Bibliographical details of Der Krieg zur See 1914–1918 (in German) Archived 17 April 2016 at the Wayback Machine
- 1914 in England
- Conflicts in 1914
- North Sea operations of World War I
- Naval battles of World War I involving the United Kingdom
- Naval battles of World War I involving Germany
- History of Scarborough, North Yorkshire
- Whitby
- World War I raids
- Military history of County Durham
- 1910s in Yorkshire
- 20th century in County Durham
- Maritime incidents in England
- December 1914 events
- Germany–United Kingdom military relations
- History of Hartlepool
- Military history of Yorkshire
- Naval bombing operations and battles of World War I
- Building bombings in England
- Mass murder in 1914
- World War I crimes by Imperial Germany
- Hotel bombings in the United Kingdom
- Church bombings in the United Kingdom
- Attacks on buildings and structures in the 1910s